Layout and Storage in a Small Shop
After 30 years of living in a house in Vancouver, B.C., Alan McIvor decided to convert the single-car garage into a shop.

Synopsis: After 30 years of living in a house in Vancouver, B.C., Alan McIvor decided to convert the single-car garage into a shop. The small space forced him to consider every decision carefully, but he has been able to build many large pieces of furniture in it. The shop is anchored by the table saw and its outfeed/assembly table, with other machines on the perimeter.
A TIGHT SPACE TURNED OUT TO BE PLENTY
Thirty years after my wife and I bought our house in Vancouver, I plunged deeper into woodworking and decided to convert the single-car garage into a shop. It was a basic structure, built around 1950, with 2x4s for wall studs, roof joists, and rafters. There was a bare concrete floor slab, a 15-amp electrical service, and no insulation in the roof, walls, or floor.
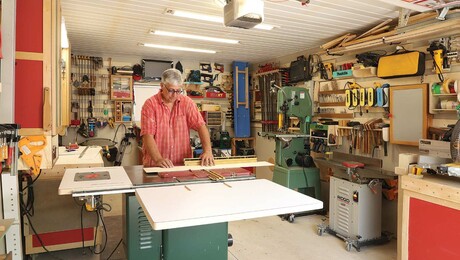
With a footprint a bit over 200 sq. ft. and a ceiling height just over 7 ft., it wasn’t exactly roomy for a hop, and the space constraints forced me to consider every move I made in placing machines and work surfaces, and devising storage. But over the years, I have been able to build many large pieces of furniture in it, including a dining table nearly 8 ft. long.
I did all the updating of the shop myself, except for the electrical work and the installation of a double-door and two slider windows. Knowing I would need to utilize the walls for storage, I used 1/2-in.-thick plywood for them, which made it easy to hang brackets, tools, and cabinets. In total, I spent about $3,000 for doors and windows, lighting fixtures, lumber, hardware, insulation, and painting materials, and another $5,000 for the electrical and roofing contractors.
The heart of the shop
 The most prominent feature of the shop is a combination outfeed and assembly table that measures 45 in. wide and 74 in. long. Besides supporting long boards and plywood during table-saw rip cuts, it provides a flat surface for glue-ups and serves as the base for my panel-clamping jig (shown in FWW #300). It is also where I apply finish to my projects. The table top rests on two cabinets where I store small power tools, my router-mortising jig, and small clamps and cauls. To utilize the space between those cabinets, I built a couple of open-topped plywood boxes that slide out on casters and hold my offcuts.
For many years, my table saw was an 8-in. Rockwell Beaver that I inherited from my father. That saw made quite a lot of furniture. But the SawStop I replaced it with several years ago is a revelation: bigger, beautifully engineered, precise, and very accurate. And, of course, it has the flesh-sensing capability that instantaneously stops the sawblade. As a mechanical engineer, I very much appreciate the good design and high-quality workmanship of this machine.
I have built many crosscut sleds for the table saw—long ones, wide ones, short ones, one for cutting 45° bevels, and one to cut 45° miters. To store them efficiently, I varied their front-to-back dimensions so four can nest inside each other as they lean against the wall.


Log in or create an account to post a comment.
Sign up Log in